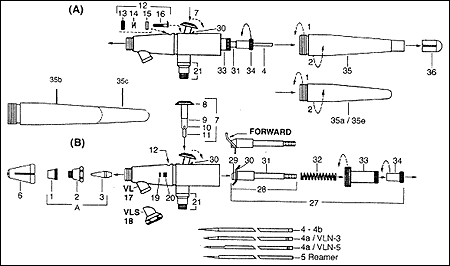
Exploded view and Parts list
see general instructions below for daily Operation & Cleaning

Parts List
Numbers correspond to items above. Please refer to
actual manufacturers number (ie. VLM-3) when placing order or calling for
information (not the list number, ie. 18.)
| A. VLM-1,
3 or
5 Multiplehead
2. VLB Aircap Body 4b. VLN-1POL Polished Needle 5. VL-54 Reamer 6. VL-189 Head Protecting Cap 7. VL-174 Finger Lever Assembly 8. VL-135A Finger Button 9. VL-165A Finger Lever 10. Lever Pivot 11. VL-59 Piston 12. VL-175 Line Adjustment Assembly 13. V-167 Line Adjustment Nut 14. V-168 Finger Stop Spring 15. V-169 Friction Seat 16. V-166 Line Adjusting Screw 17. VL-163 Shell Assembly (VL) 18. VLS-163 Shell Assembly (VLS) |
19. MU-61 Packing Washer
20. MU-62 Packing Nut 21. VL-176 Air Valve Assembly 22. VL-20 Valve Casing 23. A-52 Valve Washer (12) 24. H-21A Valve Plunger 25. A-22 Valve Spring 26. A-23A Air Valve Nut 27. VL-186 Needle Housing Assembly 28. L-191A Rocker Assembly 29. V-144 Pin 30. VL-142 Rocker 31. VL-137A Needle Support 32. VL-140 Spring 33. VL-136A Needle Adjusting Sleeve 34. VL-141 Locknut 35. VL-134N Handle 35b. HVL-203 Stubby Metal Handle 35c. HVL-202 Standard Metal Handle 36. VL-118 Protecting Cap |
The Airbrush is held in the same manner as a pen, with the index finger comfortably over the finger button.
1 . Attach airhose to air supply and allow to blow a few seconds at full pressure. Shut off air supply before attaching to airbrush. This procedure will remove dirt from airline and hose.
2. Attach airhose coupling to airbrush.
3. For VL attach the color cup or bottle assembly to color socket. VLS use firm twisting motion to 'screw-on" bottle assemblies. For V or VV insert color cup and bottle assemblies into side fluid hole. VJR add fluid to permanently mounted color cup.
4. Remove Head Protecting Cap-#6.
5. Press down on Finger Button-#8 to release air and pull back on button to control quantity of color.
6. If pre-regulated amount of fluid is desired adjust Line Adjusting Nut-#13. This control will give the operator the same amount of fluid each time the Finger Button-#8 is depressed.
7. To spray a fine line without heavy ends, start moving the airbrush without release of color. Then start the color at the beginning of line and stop the color at the end, but continue the motion of the airbrush after the color has stopped.
8. Practice this movement until you can spray a fine line or a broad pattern without heavy build up at the beginning or end of your strokes.
9. Speed of movement controls density of color and fading effects at beginning and end of strokes.
10. For detail, hold the airbrush close to the surface push down for air and pull back very slowly on the Finger Button-#8.
11. For background work and broad effects, hold the airbrush away from work and pull back on Finger Button-#B to release required amount of color.
12. For more instruction see the "22 Airbrush Lessons for Beginners" booklet enclosed with your airbrush.
1. Pour remaining color back into its container.
2. Rinse and wipe color cup or bottle assembly clean.
3. Spray a small amount of water/solvent through the airbrush until it comes out clear.
4. To back-flush color from the airbrush keep bottle assembly or color cup attached. If using a color cup you must cover the top of it with your thumb or a cloth to keep color from blowing out.
5. Place one finger over the Aircap #1 of the airbrush and release some air by depressing the Finger Button-#8. This causes back pressure which induces a bubble action inside the airbrush and container. This helps clean the fluid passages.